Generating Images
Learn how to generate images using Cubby Image's powerful AI models. This guide covers the complete interface and all available options.
Interface Overview
The Generate Images panel contains all the controls you need to create AI-generated images.
UI Elements Reference
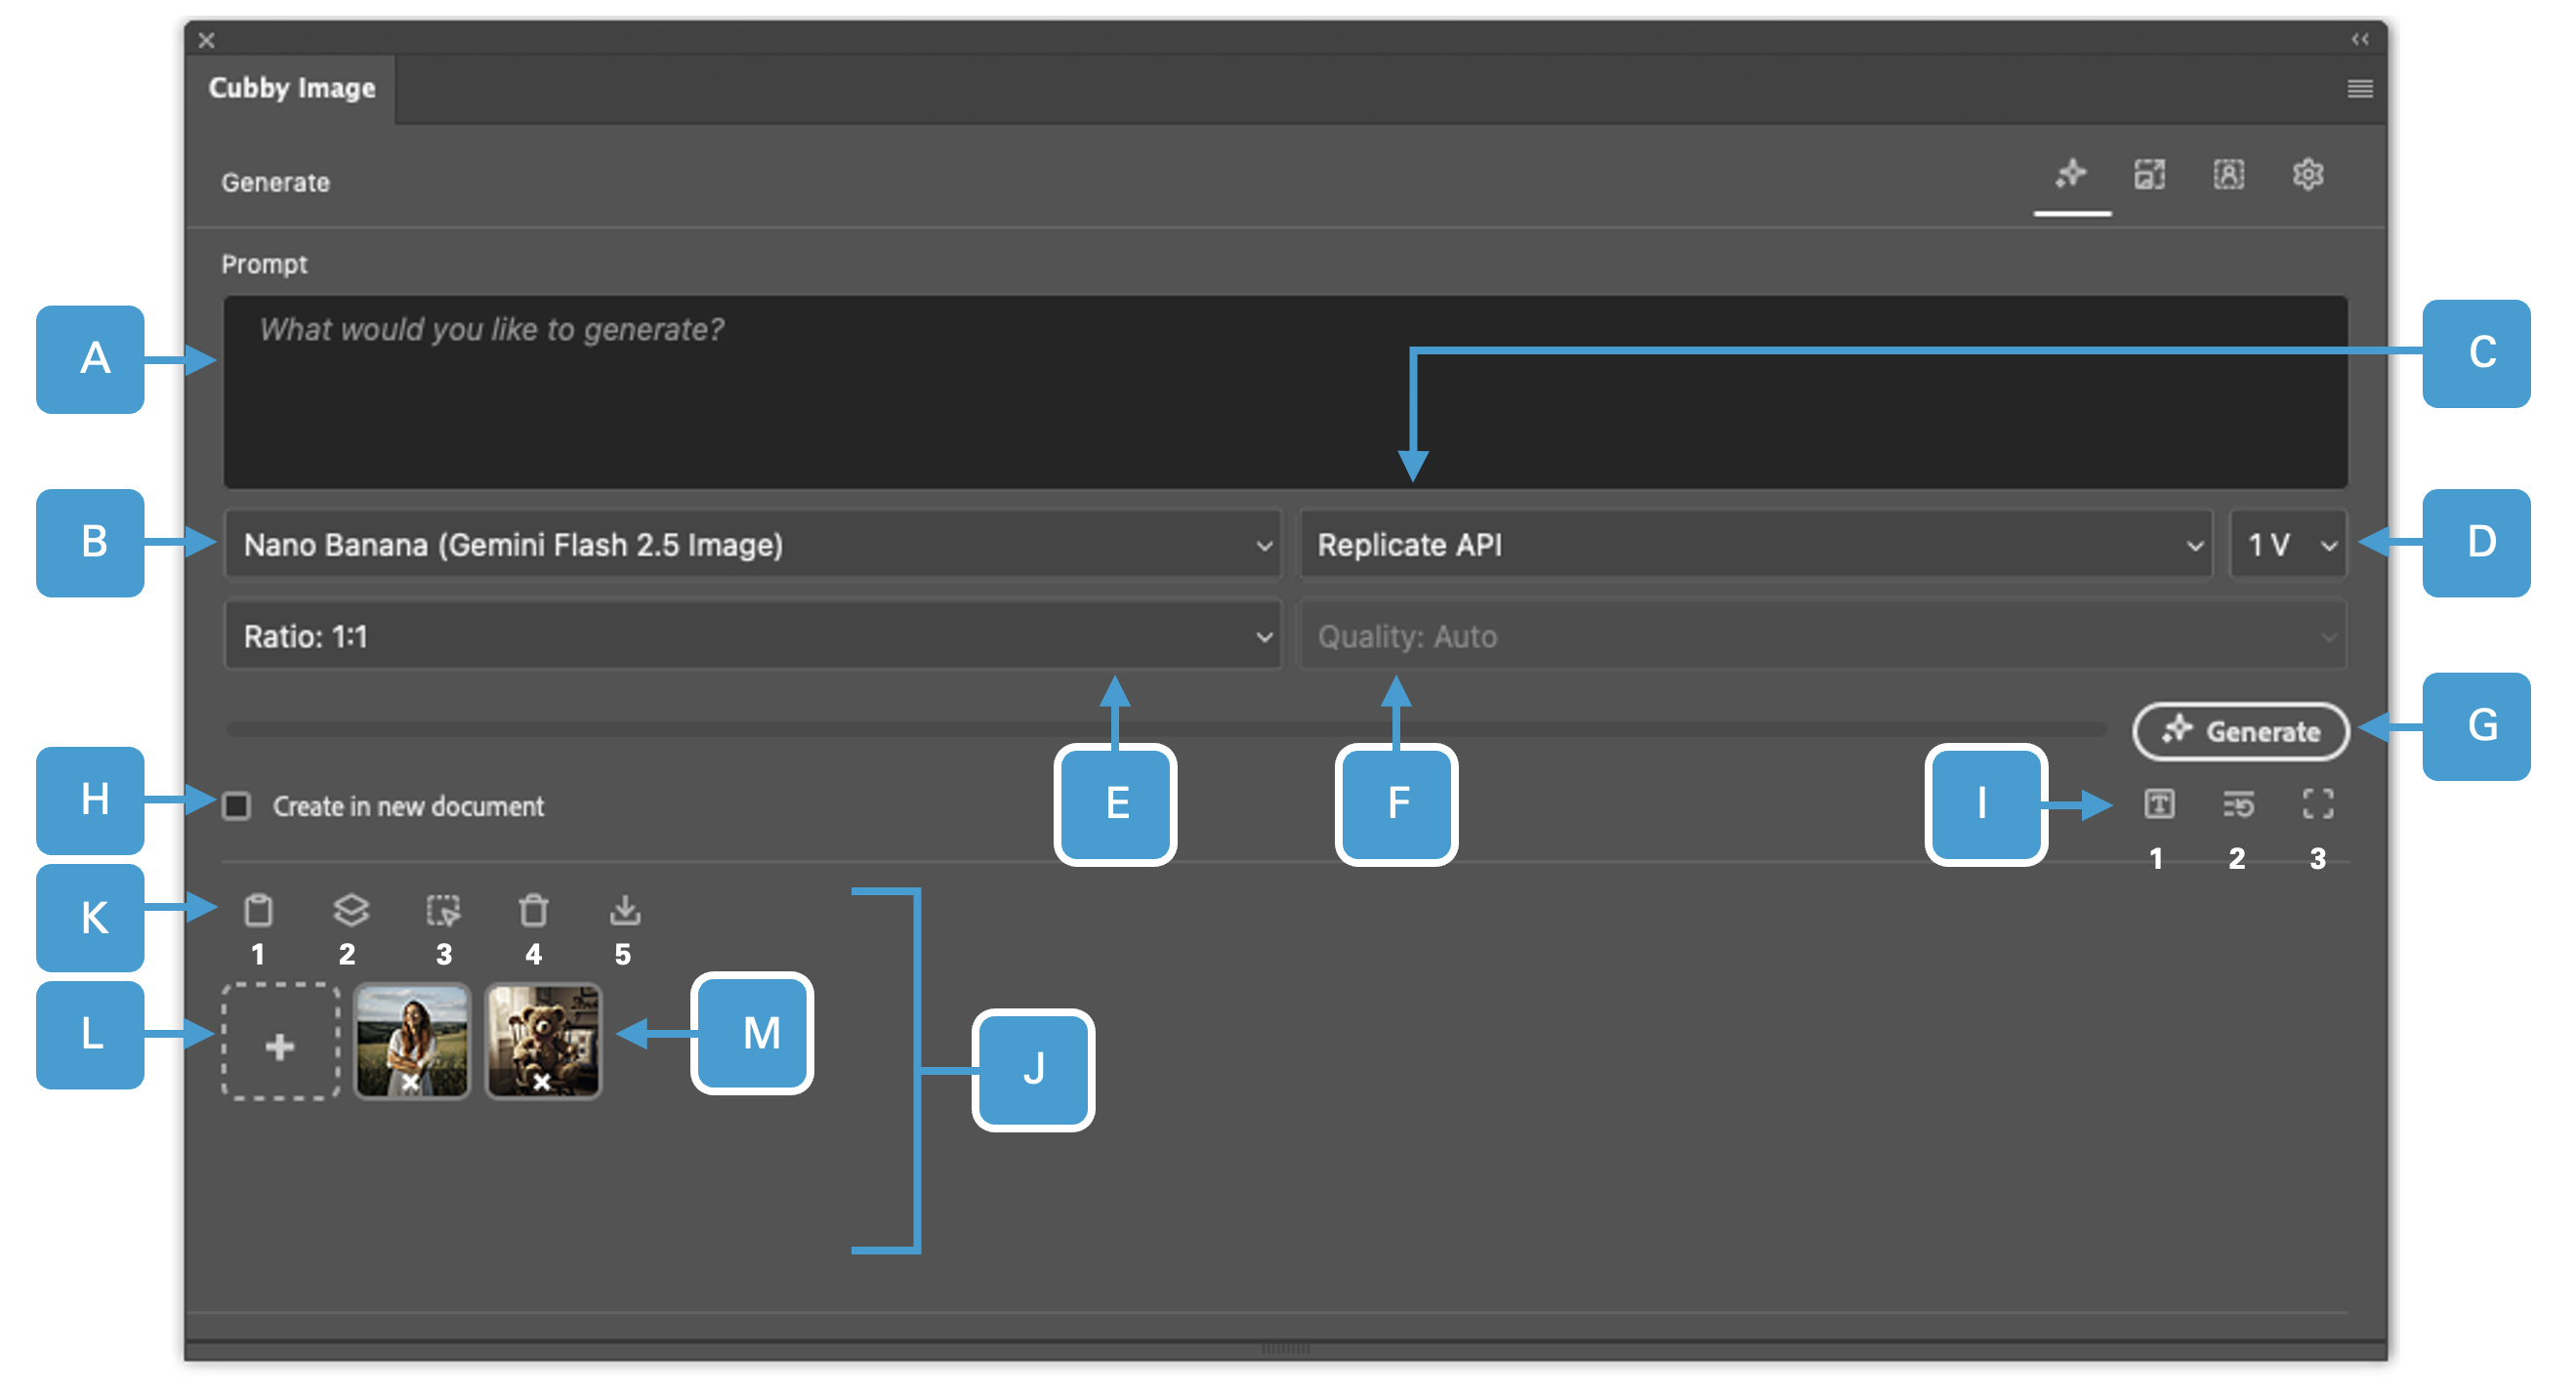
| # | UI Element | Description |
|---|---|---|
| A | Prompt | Enter a prompt – describe your image or the edits you want to make. |
| B | Models | A list of all available models. Please refer to the APIs and Models section to see which API provides access to which model. |
| C | API Provider | A list of all available API providers. Please refer to the APIs and Models section to see which API provides access to which model. |
| D | Variants | The number of variants that are created at a time. You can set 1-4 images at once. |
| E | Ratio | Set the aspect ratio your image should be generated in. |
| F | Quality | Set the quality your image should be generated in (only Seedream 4.0). |
| G | Generate | Click the generate button to start generating images. |
| H | Create in New Document | Create the image in a new document. |
| I | Quick Actions | 1. Reuse Prompt: While a previously generated layer is selected, you can click this button to reuse its prompt. This makes it easy to create quick variations. Note: The plugin does not permanently retain prompt, selection and context image data. You can only reuse prompts for layers generated during the current session. Once you close and reopen the document, this function will no longer be available for previously generated layers. 2. Reuse Settings: While a previously generated layer is selected, click this button to reuse its settings (including prompt, selection, and context images). This enables quick versioning. Note: The plugin does not permanently retain prompt, selection and context image data. You can only reuse prompts for layers generated during the current session. Once you close and reopen the document, this function will no longer be available for previously generated layers. 3. Select All: Select the whole canvas. |
| J | Context Images | Add context images to guide the image you are trying to generate, mix and match images or edit an image. You can reorder the context images by dragging and dropping them. By clicking on the 'x' symbol you can remove the image. |
| K | Action Buttons | 1. Get Image from Clipboard: Copy an image and paste it right from your clipboard as a context image. 2. Get Layer: Paste an entire layer as a context image. 3. Get Selection: Create a selection on the canvas with the selection (brush) tool and paste it as a context image. The selection functions independent of the layer, meaning it does not matter what layer is currently selected, it will ignore it and sample a selection from the whole canvas. 4. Remove all Context Images: Remove all context images at once. 5. Paste all Context Images: Pastes all current context images on your canvas as separate layers. |
| L | Add Context Image from file explorer | Opens the file explorer to import new context image. |
Main Controls
Model Information
The Generate panel includes the following AI models:
- Nano Banana - Fast, multimodal image creation powered by Google Gemini 2.5 Flash
- Seedream 4.0 - Next-generation photorealistic model for unified creation and editing
- Flux Kontext Pro - Professional-grade image generation with precise in-context editing
- Flux Kontext Max - Maximum-fidelity image synthesis built on the FLUX.1 Kontext architecture
- QWEN Image Edit - Advanced AI model for high-accuracy, text-aware image editing
- Reve Edit - High-quality AI image generation model
Please refer to the APIs and Models section for detailed information about which API provides access to which model.
Prompting Tips
For better results when entering prompts:
- Be specific about subjects, style, lighting, and composition
- Different models respond to different prompting styles - read up on best practices for your chosen model
- Experiment with different phrasings to find what works best
- The more detailed and specific your prompt, the better the results will be
Working with Context Images
Context images guide the AI to produce results based on existing images. You can mix and match multiple context images for creative results.
Adding and Managing Context Images
The Context Images panel (J) displays all currently loaded context images. You can reorder them by dragging and dropping, and remove individual images by clicking the 'x' symbol.
Action Buttons (K) provide multiple ways to add context images:
- Copy an image from anywhere and paste it from your clipboard
- Grab an entire layer from your current document
- Create a selection on the canvas and use it as a context image (samples from the entire visible canvas)
- Remove all context images at once
- Paste all context images onto your canvas as separate layers
You can also import from file (L) by clicking to browse your computer and select an image file.
Quick Actions
The Quick Actions panel (I) provides shortcuts for efficient workflows:
Reuse Prompt
While a previously generated layer is selected, click this button to automatically load its prompt. This makes it easy to create quick variations with different models or settings.
Reuse Settings
While a previously generated layer is selected, click this button to reuse all its settings, including prompt, selection, and context images. This enables quick versioning and experimentation.
Select All
Click to select the entire canvas. This is useful when you want to generate images that fill your entire document. You can also use Photoshop's standard selection tools to create custom selections before generating.
The plugin does not permanently retain prompt, selection, and context image data. You can only reuse prompts and settings for layers generated during the current session. Once you close and reopen the document, this function will no longer be available for previously generated layers.
Workflow Tips
- Start Simple: Begin with a basic prompt and refine based on results
- Use Context Images: Add reference images to guide the style and composition
- Generate Multiple Variants: Create 2-4 variants to explore different interpretations
- Iterate: Use "Reuse Prompt" to quickly try different models or settings
- Layer Organization: Generated images appear as new layers, making it easy to compare and blend results
Troubleshooting
My generation failed
There can be many reasons why a generation fails:
- First step: Try again - temporary network issues can cause failures
- Content filters: Some models have stricter content filters. Try switching to a different model or provider
- Adjust your input: Modify your prompt or context images if the failure persists
I'm getting slow results
Processing speed depends on the model and API provider:
- Seedream 4.0 usually takes longer than Nano Banana
- Some delay is normal - be patient for high-quality results
- Check the provider's status page if delays seem unusual
The quality isn't good
Different models require different prompting styles:
- Read best practices for your specific model
- Be more detailed and specific in your prompts
- Try different models to find which works best for your use case
- Experiment with context images to guide the results
Next Steps
- Learn about upscaling images to enhance resolution
- Explore the Settings panel to manage your API keys
- Check the APIs & Models reference for detailed model information